Cubera 120 Manual
The Cubera 120 fishing kayak has a unique no-sink, no-flex, open deck with comfort-grip padding providing superior stability, comfort, storage and maneuverability. For those chasing down their next catch, the Cubera provides optimal customization for rigging.
This quick start guide covers the basic install, setup and operation of key Cubera components and accessories, such as:
- Vibe Summit Seat With Optional Summit Perch
- Vibe Phantom Grip Handles
- Top-Loading Gear Tracks
- Power-Pole Mount
- Replaceable Skid Plate
For your safety and to ensure your highest level of enjoyment from the Cubera 120, it is important that you read and comply with the included Owners Manual and safety information that came with your Cubera.
INCLUDED WITH YOUR CUBERA
All Cubera fishing kayaks come with certain parts and components, to include but not limited to:
- No Flex Solid Deck
- Comfort Grip Deck Padding
- 8" Sealed V-Wave Deck Plate with Cargo Bin
- Front Cargo Storage Area With Bungee Tie Down System
- 7 Integrated Top-loading Gear Tracks
- 4 Vibe Phantom Grip Handles
- Molded-In Comfort Grip, Center Deck
- 2 Side Bungee Paddle Parks
- 6 Cooler or Seat Tie Down Points
- Seat Mounting Tracks Compatible with Vibe Summit Seat with Optional Summit Perch
- Rear Cargo Storage Area with Bungee Tie Down System
- Power-Pole/Large Accessory Mount
- Replaceable Skid Plate
VIBE SUMMIT SEAT
The Cubera 120 has the option of attaching the 4-position Summit Seat with optional Summit Perch which provides an unrivaled level of comfort, power paddle positioning and more optimized sight-fishing opportunities.
The only tool you will need is a Phillip’s head screwdriver.
Instructions:
- Take the bolts out of the seat clamp at the rear of the seat
- Turn the clamps so the tabs face up
- Insert the dog ears on the seat back into the tabs on the seat
- Reinsert and tighten down the bolts
- Thread the strap under and through the buckle and down through the front
- Flip the seat over and tighten the straps on the bottom (like really, really tighten them, you can do it!)
- After the seat is assembled, installation is easy. You will essentially just be slotting some track mount T-bolts into a gear track.
- Loosen the T-bolts on the bottom of the base until they are at the end of the threads
- Place the T-bolts into the tracks and twist the knobs until it starts to tighten, leaving it a little loose right now, the Summit seat has adjustable trimming, so you can choose how far back/forward you want your seat to be, once you choose your position go ahead and turn the knobs until they are tight.
With the base installed, you can now select any of the 4 seating positions and install the seat itself. This adjustment can also be done on the water if you want to change up your seating position as the day progresses.
The seating positions are:
- Recumbent Low (front bar down, back in the bottom notch)
- Neutral (front bar down, top notch in back)
- High (front bar up, back in top notch)
- Recumbent high (front bar up, back in bottom notch)
- Installing the seat itself only takes seconds and can be done on the water with some practice.
- Place the seat onto the supports
- Secure the rear bungee over the bar
- Secure the front by flipping the shrimp clips up over the bar
If you have the Summit Perch installed, it gives you an elevated seat in any position, but it is most optimal in the neutral position.
Get out there and enjoy all day comfort with the new Vibe Summit Seat. You now own the pinnacle of kayak comfort and versatility.
(Optional) VIBE SUMMIT PERCH
The Vibe Summit Seat is a new and exciting accessory by itself. It is almost infinitely adjustable to suit your personal preference or fishing style. It takes everything we love about the Vibe Hero seat and ELEVATES it, literally. The seat already sits up higher off the deck than ever before, but it has one more trick up its sleeve.
That is where the Vibe Summit Seat Perch comes into play. This perch allows you to sit or stand 16” off the water. This will bring your sight fishing game to new unprecedented heights.
Standing on the perch gives you the absolute best casting clearance for making those sidearm casts under cover. It allows you the full range of motion to make that perfect pitch or flip to entice that next bite. And if standing in a kayak is not your thing, sitting up on the elevated Summit Perch will give you that higher point of view that you can usually only get from standing up.
So, you are sold on the idea, but how do you install it?
Installation is easy! You can follow these easy steps and watch this video and you should be able to do it yourself in a matter of minutes.
The only tool required is a Philips head screwdriver
Instructions:
- Take the Summit Seat out of the kayak and set it on a nice solid surface like a table.
- Take the perch mounts and place them loosely on all 4 corners on the back of the seat.
- Install the hardware loosely in the mounts as you will need to adjust later.
- Line up the 4 posts on the perch with the posts, moving the posts as needed so the perch fits snuggly over all of them.
- Once the perch is in place, make sure that the posts are seated fully onto the perch.
- Tighten all hardware.
And that is all there is to it! With the Vibe Summit Seat and the Summit Perch you now have an unprecedented advantage. Taking your sight fishing game to new heights.
VIBE PHANTOM GRIP HANDLE
4 Vibe Phantom Grip carrying handles are included with each Cubera, creating a super comfortable grip and which eliminate pinch points. These Phantom Grip Handles come unassembled on the kayak, but it's very fast and easy to attach them.
The only tool you will need is a Philips screwdriver.
Instructions:
- Separate out which handles go on the sides, and which 2 go on the bow/stern. The side handles have bungees attached for using as a paddle park.
- For the side handles, place the bolts through the handle, then through the tabs on the bungee before securing them in place with the screwdriver in the threaded inserts being careful to not overtighten.
- For the bow/stern, the bolts go through the deck and out the other side to be tightened down with nuts and washers.
VIBE TOP-LOADING GEAR TRACKS
Top-loading gear tracks will allow you to easily attach external rod holders, camera mounts, gear retractors and more, so that any essential gear is close-at-hand when you need it most.
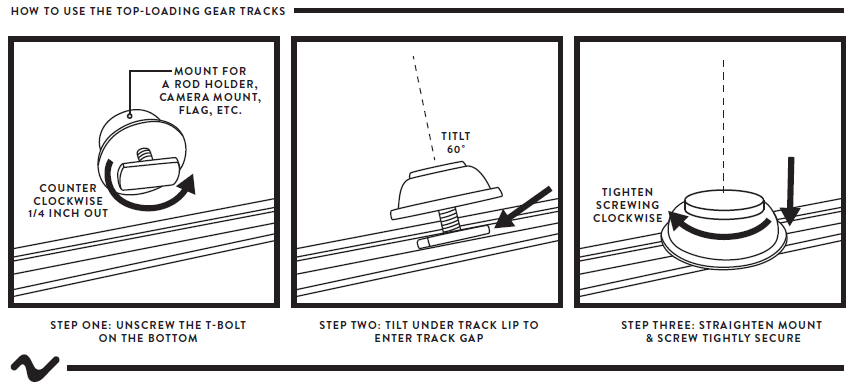
No tools are needed, as the gear tracks come pre-installed.
Instructions:
- Unscrew the T-Bolt on your accessory until it is almost removed from the accessory.
- Tilt the accessory at an angle.
- Insert the T-bolt into the top of the track.
- Straighten the accessory and tighten down the bolts until secure.
POWER-POLE MOUNT
The Cubera also features a Power-Pole Mount which can be used to mount a Power-Pole for use in anchoring within shallow waters.
INSTALLATION OF A POWER-POLE
The only tool you will need is a Phillip’s screwdriver
Instructions:
- Set the base for the Power-Pole on top of the inserts at the back of the kayak. Lining up the holes with the inserts. (The vertical plastic tabs go towards the rear)
- Tighten the base down to the kayak being careful to not over tighten.
- Lower the Power-Pole assembly onto the base lining the holes up with the tabs.
- Insert the long bolt through the tab, securing the assembly to the base by threading the large plastic nut into place.
- Add the anchor pole itself and secure it into place with the down button.
REPLACEABLE SKID PLATE
The replaceable skid plate on the Cubera 120 keep the keel of the kayak protected from damage due to dragging over rough surfaces.
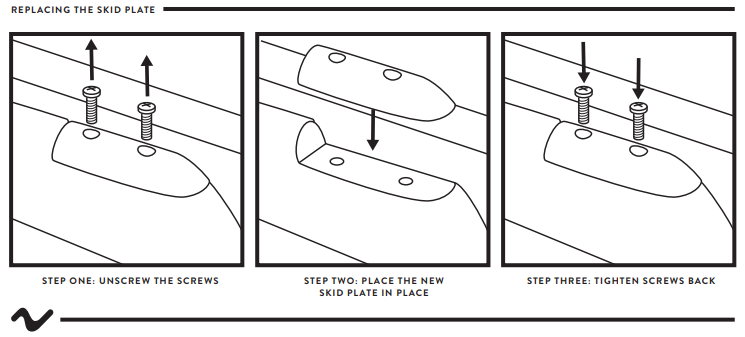
The only tool you will need is a Phillip’s screwdriver
Instructions:
- Flip your boat upside down
- Unscrew the bolts holding the old skid plate in place
- Place the new skid plate in place
- Tighten down the bolts.
Related Articles
Cubera 125 Lite Manual
All Cubera Lite iSUPs come standard with certain parts and components including but not limited to: Vibe Switchback Seat Vibe 3 ft Seat Straps (x4) Vibe High Volume Floor Pump Vibe Roamer 4 Piece Hybrid Paddle Vibe Ankle Tether Vibe Roller Bag ...Inflatable Kayak - Valve, Pump, and Inflation Troubleshooting (Cubera, Uptown)
This article covers the Vibe Cubera 120, Cubera 125 Lite, and Uptown 100 Lite inflatable kayaks. If you are having trouble inflating, connecting your pump, or the kayak is not holding pressure, this guide will walk you through the most common causes ...Impulse Drive Re-Gear Kit Manual
Your Impulse Drive Re-gear Kit comes with 3 different gear ratios 6:1, 8:1, and 10:1. With each step up in gear ratio you will gain more revolutions of the propeller per revolution of the pedals, this will come at the expense of effort needed to ...Skipjack Manual
The Skipjack Series fishing and recreational kayaks – the 12-foot 120T tandem “companion-ready” kayak, and the “throw and go sports car” 9-foot 90 – offers greater maneuverability, greater stability and more flexibility across all sorts of on-water ...Yellowfin Manual
The Yellowfin Performance Series fishing kayaks – the rudder-ready 13-foot 130T tandem kayak, the rudder-ready 12-foot 120, and the 10-foot 100 – all offer game-changing speed & stability combined with pro fishing performance. Vibe Yellowfins are the ...